Showing posts with label Recipes. Show all posts

Monday, March 29, 2010

Cannot Get Enough!


I was surfing the Internet recently, looking for a good recipe for sweet potato fries, when I accidentally came across this avocado dip recipe from Ingrid Hoffman on the Food Network Website. It is the recipe for a dip that she eats with her sweet potato fries. I didn't have all the necessary spices for her version of the fries, but the dip recipe looked really, really good, so I decided to make it anyway and now the girl and I are totally addicted!

We eat it on carrot sticks mainly, but also on "Hint of Salt Saltine Crackers"...because I'm allowed to eat those. I have also put it on my breakfast tacos, and it was amazing there too. I suspect it's pretty good on chips, although I'm not allowed to eat those, so you'll have to try that one out for yourself. I still haven't tried the version of sweet potato fries that are supposed to accompany the dip, but I have several sweet potatoes just waiting to be made into fries, so I'll be checking that out soon too!

As with most recipes, I did change things up just a bit to fit in with my diet needs as well as palate choices. So you can click the link above to get the original recipe, or if you like a bit more avocado and a lot more kick, you can try my version below. One tip I will point out is to use Haas Avocados in this dip. In Ingrid's recipe she mentions that Haas Avocados will produce a smoother dip...she is correct! I used a different kind on my latest batch because they were on sale, and the dip came out with small chunks that I could not process out. It still tastes good, but smoother is just nicer with a veggie dip. Also, the original recipe calls for you to remove the seeds from your jalapeno before adding it to the dip. Ahem. We are Texas women over here, and that would have just been sacrilegious...plus, the girl likes her heat!

TEXAS-STYLE AVOCADO DIP

Ingredient List:
2 Haas Avocados (be sure they're ripe...aka soft)
1 jalapeno
1 tablespoon diced red onion
1 clove garlic
juice of 1 lime
1/3 cup cream cheese
1/3 cup mayonnaise
ground pepper

Putting it all Together:
Slice the avocado in half and remove the pit. Scoop the meat of the avocado out of the skin with a spoon, cut into chunks and toss in the food processor.
Slice the jalapeno in half-lengthwise, then in half-lengthwise again, then dice into smaller bits and throw it all into the food processor with the avocado...seeds and all!
Mince the clove of garlic and add it and the onion to the food processor as well.
Cut the cream cheese into small chunks and throw it in with everything else.
Add the mayo and the lime juice and get ready to blend!
Process at high speed until all ingredients are well blended and smooth.
Add pepper to taste.

DIG IN!

*Note: the above picture is random, not an actual picture of this dip. This dip will be a lovely pale, pale green and very smooth. Also, I have tried this with low-fat cream cheese, and light mayo. I kept the light mayo, but went back to regular cream cheese because it made the dip too runny to use the low fat version...AND the low fat/fat free cream cheese has more salt in it than the regular version. While I'm allowed a very small amount of dairy each day, salt is a big no-no, so that influenced my choice as well. But feel free to experiment with what you like and make it any way you want!


Monday, September 14, 2009

Vidalia Onion "Sweet Texas Onion" Casserole

I do believe that I promised y'all some “Vidalia Onion Casserole” goodness a little while back….and I’m finally going to deliver!

Now this obsession-o-mine all started one Sunday afternoon when someone posted on Twitter that they were "so thankful for the ladies church for making Vidalia Onion Casserole"….and my mouth began to water.

So I immediately googled “Vidalia Onion Casserole” and discovered a veritable cornucopia of recipes for “Vidalia Onion Casserole” I chose this particular recipe because it looked like it would be the easiest to prepare, and was easily adaptable to my stupid diet restrictions…humph!

I have taken a few lessons from Barb, and will be posting my own “healthier version” of this recipe in tutorial form…with pictures! Now, you can use the original recipe at the link above if you like, but if you have high blood pressure, high cholesterol, or you know, chronic kidney disease...you're welcome to try out my version! :)

When I was touring with “The Trinity Singers” to try to recruit students and funds for my college, I had the privilege of tasting the renowned Vidalia Onion at a Baptist church somewhere in Georgia, and so I knew that it was a larger, sweeter variety of onion. Therefore, when I went to my local H.E.B. and didn’t find any Vidalia Onions, I decided that “Texas Sweet Onions” would work just fine…and they do.

Since I did need to alter the recipe to accommodate my low-sodium, practically-no-dairy, low-fat diet, AND since I didn’t use Vidalia Onions, I’ve decided just to rename this recipe completely, and I call it:

Texas Sweet Onion Casserole


Ingredients:

4 large Texas Sweet Onions
1 sleeve of “Ritz ‘Hint of Salt’ Crackers” ( real life saver for the low-sodium dieter!)
¼ cup (½ stick) of “Smart Balance 50/50 Butter” (all the butter flavor without all the fat and cholesterol!
2 tablespoons of Coconut Oil (it has less of the "bad" fats, and more of the "good" ones, plus it has a nice sweet flavor)
Grated Parmesan Cheese
“Butter Flavored Crisco Cooking Spray” (or whatever non-stick spray you prefer)

Preparation:

Slice onions thin (I cut my onions into fourths before slicing so I had smaller pieces….just my preference)

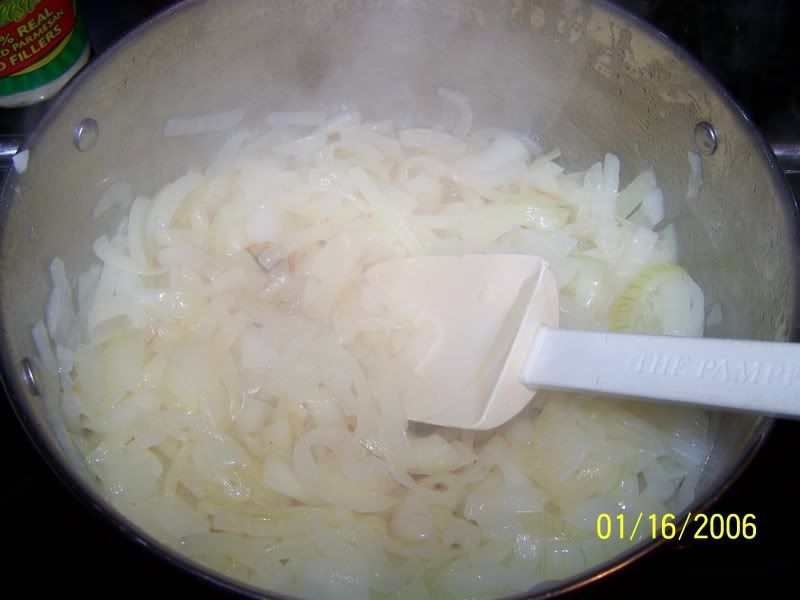
Add butter, coconut oil, and onions in a large saucepan and saute over high heat until onions are translucent, soft, and just starting to brown. (Normally, I just use my 14” skillet, but I had loaned it to my neighbor for the evening. J ) This will take about 20-25 minutes…generally.


Crush the crackers until they resemble coarse bread crumbs. (I used a Ziploc bag and a rolling pin the first time I made this, but I used my food processor this time!)

Spray a 2 quart Casserole Dish with non-stick cooking spray.

When your onions are ready, add ½ of them to the bottom of the casserole dish.

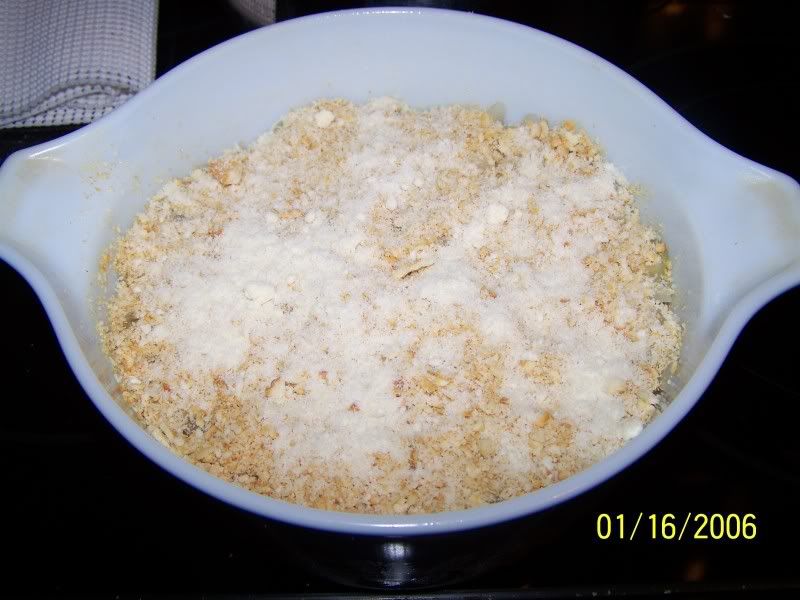
Top with ½ of the cracker crumbs, and lightly sprinkle a layer of Parmesan cheese over the crackers. (Because I can’t have much cheese, I just used the Kraft version in the shaker, but I am willing to bet that if you can eat cheese, that REAL GRATED PARMESAN would be amazing!)

Now add another layer of onions, crackers, and Parmesan cheese and bake at 350 for about 25 minutes or until the cheese is brown and toasty! I put the Cooking Spray and Parmesan in this picture because I forgot them in the ingredient photo, and I didn't want them to be left out. :)


Now, this dish is categorized as a side-dish, but at our house, we tend to use it more as a condiment. J

We put it on top of pork chops, steak, meatloaf, and on this particular evening, on baked chicken. YUM!

As you can probably guess, there is a lot of casserole left over when it is only used as a condiment…and THAT is all part of my plan people. For the next week, I will enjoy the leftovers in various forms. Of course, if there is any chicken left, there’s that, but I also top my Spanish beef and rice dish with it...


...and my FAV is to make a plain baked potato and put a healthy helping of the casserole on top and stir it all together. It totally makes up for not being able to eat a loaded baked potato (no sour cream, no cheese, no bacon…you get the point).

So there you have it, my latest culinary discovery! If you decide to try it, please come back and leave me a comment... especially if you come up with something else I can eat with it! :)

Sunday, February 1, 2009

White Chocolate Covered Popcorn

I totally forgot that I promised this recipe with my review of INKHEART! I deeply apologize...

This isn't really a recipe as I don't particularly measure very carefully, but rather "eyeball" it!

All you do, is pop about 1/2 cup of popcorn in an air-popper. Then melt about 1 cup of white chocolate morsels in the microwave 30 seconds at a time until completely melted. (Be careful, because you can over cook them, and they will be ruined.) Then, in a large bowl, pour the melted white chocolate over the popcorn and stir to coat all the popcorn.
Finally, spread the mixture out on a baking sheet and allow to cool. The white chocolate will harden back up, and you have a very tasty treat!

I made this for the Super Bowl tonight, and I used Wilton's Red Apeels instead of white chocolate because we are cheering for the Cardinals, and we wanted it to be red! :) It worked great and tastes really good too!

I posted a picture here, but since I'm on my phone, I can't load it here to the blog....sigh. Maybe one of these days I'll figure out how to do that!

Enjoy your popcorn, and. GO CARDINALS!

Monday, December 29, 2008

Taco Soup....yum!

I've gotten a few requests for my Taco Soup recipe, so I thought I'd share it today! I thought that the last time I made it, I took pictures along the way for just such an occasion, but I can't seem to find them on my hard-drive...sigh. So, this will not be a tutorial a'la Barb, but you will have some amazing soup anyway!


Ingredients:

1 lb. of hamburger
2-3 stalks of celery (depending on how much you like celeryWinky)
1 lb. Mango Pico de Gallo (I find this in the produce section of my HEB, if you can't find it, just use any mild Pico de Gallo and add in diced mangoes--the mangoes aren't essential, but add a sweetness to the soup!)
14.5 oz can of kidney beans
14.5 oz can of black beans
14.5 oz can of whole kernel corn
26-28 oz can of Fire-Roasted diced tomatoes
12-14 oz jar of your favorite salsa (I use chipotle flavored, but whatever you like is good)
1 cup of rice (I use regular, but instant should work too)
2 cups water

Add Ons:

Grated Cheese
Tortilla Strips

Directions:

Brown Hamburger, Celery, and Pico de Gallo in a large pot until meat is good and brown
Add remaining ingredients and stir
Simmer for at least 20 minutes on the stove.

To Serve:

Scoop into bowls and top with grated cheese and tortilla strips. (I use Mexican Blend cheese and my HEB sells these Tri-Colored Tortilla Strips in the Produce section--with the croutons--that make a really pretty presentation!)

**I use organic meat and veggies in this and all the canned goods are "no-salt added", so I also add a dash of black and red pepper to my bowl and my favorite salt-free seasoning. You may season as you see fit!
Chef

Tuesday, December 16, 2008

Christmas Doughnuts....mmmmm

Last night, I made this cake for a Ladies' Dinner for my church. (red velvet cake with vanilla-peppermint buttercream icing)

Candy Cane Cake for Church Dinner...yum! on TwitPic

This morning, I decided to make doughnuts for the kids, and since I had some crushed peppermint candy left over from the cake, I decided to add a Christmas flair to our usual doughnut flavors.

They are very simple, and all the kids were able to help! Here's how we made them:

Ingredients:

  • Texas-Size Canned Biscuits (if you don't live in Texas, they are probably just called "jumbo") Happy
  • Powdered Sugar
  • Cinnamon Sugar
  • Vanilla Powder
  • Crushed Peppermint Candy (you can either crush them in the blender, or buy them "pre-crushed"

Directions:

  1. Heat shortening/oil either in a pan on the stove or in a fryer
  2. Place biscuits on a floured surface and press them out just a bit bigger than they are and cut a 1 inch circle out of the center
  3. Fry them in the oil until golden brown on both sides
  4. Repeat with "holes" you cut from the center
  5. Remove from the oil and let cool on a plate covered with some paper towels to absorb any excess oil
  6. Add 1 cup of powdered sugar to each of 3 paper lunch bags
  7. Add 1/4 cup cinnamon sugar to one of the bags, 1/2 teas. vanilla powder to another bag, and 1/4 cup crushed peppermint candy to the third bag, and shake well.
  8. Place a doughnut in the bag of your choice and shake a few times.
  9. Remove the doughnut from the bag and shake off any excess sugar.
  10. Send all the children outside to play and curl up on the sofa with a cup of coffee and your doughnuts!
  11. When you've had your fill, you can invite the children back in to have a few themselves! Drooling Bouncy Smileys

Thursday, August 28, 2008

If It Works on Wednesday...

...then it should still be good on Thursday, right?

I was going to post my recipe for "Roast Turkey in a Crock Pot" for yesterday's "Works for Me Wednesday", but since yesterday was the first time I'd actually roasted a turkey in the crock pot, I felt I should wait until it was all finished to make sure that it actually, you know...worked for me. Unfortunately, by the time I got to eat any of it, it was 9:30pm and I was not willing to stay up late and post about it....BUT it did Work for Me!

So, here's what I did...please remember that I'm on a restrictive diet for my kidney disease, so this recipe has almost no salt except what may have been in the turkey itself...


Crock Pot Roast Turkey Breast
You will need: a turkey breast (one that will fit in your crock-pot :)), baby carrots, a red onion, celery, chicken or vegetable broth, poultry seasoning and other spices of your choosing, Kitchen BouquetTM
Spray your crock pot with some non-stick cooking spray.
Cut up 3-4 stalks of celery into 2 inch pieces and add to crock pot.
Add baby carrots (I think I used about a 1/2 lb. but it all depends on the size of your family...and your crock pot :))
Cut 1/2 of a red onion into wedges and add to crock pot.
Sprinkle veggies with Poultry Seasoning, Black Pepper, and spices of your choice (this time I used Chef Prudhomme's "Magic Salt-Free Seasoning"--and it was good!)
Rinse and pat-dry your turkey breast and place on top of the veggies. ( Since this turkey breast still had the cavity for stuffing, I went ahead and put some of the carrots, celery and onions in that cavity as well.)
Pour 1-2 cups chicken or vegetable broth over the turkey and into the crock pot (I use an organic salt-free broth)
Sprinkle the turkey with more of the same spices we used above.
Brush 1 tablespoon of Kitchen BouquetTM over the turkey for added flavor and "browning"
Turn crock pot on high for the first hour, then turn down to low for 6-7 hours. (I didn't get my turkey in the pot until about noon, so at 5 I turned it back up to high, and within the hour, the little plastic thingy that is supposed to pop up when the turkey is done, had popped!)
Also, every couple of hours or so, I basted the turkey with some of the broth in the crock pot.
When the turkey is finished, slice and serve with the carrots and a green salad.
(No one in my family is interested in eating cooked celery or onion wedges, so i puree them in my food processor and use them in other recipes--like chili--for added flavor.
I also like to save the broth and use it to make rice or couscous for another meal...yummy!
Okay, that was it. It turned out delicious, and my house still smells good! I'm thinking about trying to put some stuffing in the crockpot to cook with the turkey as well next time, but I'm not sure how that would turn out. For those of you who can eat salt, I know that the Stove TopTM stuffing is really good, and you could make that to have with your crock-pot turkey if you want!
For more "Works for Me Wednesday" tips, go visit Shannon at Rocks in My Dryer!

Wednesday, July 25, 2007

Mi Vida Loca and a Chicken Recipe!

Yes, that's right. Life is crazy around here lately...not that it isn't always crazy, but for some reason I can't even seem to find a minute to blog lately! And we all KNOW that that is just NOT going to fly. Blogging is my outlet. Blogging is my link to the outside world. BLOGGING KEEPS ME SANE!!!! So, we're going to have to do something about the schedule to make sure that "Mama gets her blog time"!!

So, although I don't have time to actually, you know, write an interesting and witty post, I am going to steal a minute to post the promised chicken recipe and the cookie pictures from yesterday.

Chicken Stewed in Pineapple

1 1/2 cups juice-packed unsweetened pineapple chunks
1 cup red onions, chopped (I only used 1/4-1/2 cup as I'm feeding little kids too.)
1/2 cup tomatoes chopped, peeled (I didn't peel mine...who has time?!?)
2 tablespoons brown sugar, packed
3 tablespoons apple cider vinegar
3 cloves garlic minced
2 bay leaves
1/2 teaspoon ground cinnamon
1/4 teaspoon ground cloves
1/4 teaspoon black pepper
12 ounces chicken breasts, boneless, skinless, cut into 2-inch pieces

In a 5-quart Dutch oven or pot over medium-high heat, bring pineapple with juice, onions, tomatoes, sugar, vinegar, garlic, bay leaves, cinnamon, cloves, and pepper to a boil. Boil uncovered, stirring occasionally, for 10 minutes. Stir in chicken and return mixture to a boil. Reduce heat to low. Cover and simmer until chicken is cooked through, about 15 minutes. Discard bay leaves.

Yield 6 servings

Nutritional Values

Fat: 1 g.
Carbs: 19 g.
Protein: 14 g.
Calories: 136 kcal.

Now, just for your information, my chicken breasts were frozen, and my day was busy (as usual), so I just stuck everything in the crockpot around noon and cooked it on high for 1 hour then turned it to low and cooked it until we were ready to eat (about 6:00pm). I removed the chicken and pineapple from the crockpot and then poured the liquid into a pot on the stove. I put 2 tablespoons of cornstarch into 1/2 cup of cold water and mixed it together. Then I added that to the pot and cooked it on medium-high heat until I had a good thick sauce. I made brown rice for the kids and whole wheat couscous for myself. I made a bed of rice, added some chicken and pineapple, then poured some of the sauce over it...YUM! We also had green beans and salad...just in case you were interested!

Now for the picture of the cookies...

(There's actually a good story to go with this picture, but I'm out of time, so it will have to wait for another day!)


And I'm afraid that's all for now. Did you read this as fast as I typed it??? It seems like when I read it through for editing purposes, I was reading at light speed! Anyway, thanks for stopping by...sorry to rush you out the door, but I gotta git!

Friday, July 20, 2007

Still a Loser?


Yep, another pound gone this week! It was a tough week diet and exercise-wise, but I still managed to drop one more pound. I was really hoping to at least not gain any after the week I've had, so I'm quite happy with another pound gone.

Unfortunately, football season is starting, and although I L.O.V.E. football, it means that my evening runs are over. We won't even get home until after dark and then I'll still have to feed everyone and get them all to bed, so I've started running in the mornings....

Have I mentioned the fact that I am not exactly a "morning person"? Well, I'm not. I'm more of an afternoon person really. Anything I'm going to get done, (that requires any type of energy)will most likely get done between the hours of noon and 6:00pm. Unfortunately, during football season, all activity around the house has to stop by 4:00pm in order to get everyone ready for football/cheer practice. Then we don't get home until sometime between 8:30 and 9:00pm. So, running in the morning it is! Did I mention that today is also trash day? I had to run past everyone's stinky trash out by the curb this morning, not to mention that stretch where I was behind the garbage truck for half a block or so.... Eeeewwww!! Well, if that doesn't make you pick up speed, I don't know what will!!!

So...on to more pleasant things! I believe in my last post I promised you the recipe for my favorite breakfast drink. If you've ever had an "Orange Julius" and liked it, you are gonna LOVE this one! And since I have to have a certain amount of orange juice and a certain amount of milk each day on my kidney diet, this is a great one for me! It technically makes 2 servings, but I drink the whole thing, and I have it twice a day in order to get in the amount of O.J. and milk I have to have each day! I just use it as my allowed snacks or my dessert rather than food.

Orange Glorious

Ingredients

3/4 c. Orange Juice
1/2 c. Skim Milk ( I use 1% instead, it only adds 1 1/2 calories per serving)
2 tsp. dried egg whites
1 tsp. honey
splash of vanilla
4 ice cubes

Directions

Place all the ingredients in a blender. Process on high speed until smooth and foamy. Serve immediately.

Yield: 2 servings

Nutritional Values

Fat: 0g
Carbs: 15g
Protein: 4g
Calories: 81 cal.

Next time, I'm going to share the recipe for Chicken Stewed in Pineapple. I made it last night and oh.my.word. it was some kind of tasty! It was a little spicy for the younger kids, but Benji liked it a lot...but then again, Benji likes pineapple and the others don't, so that might have been part of it too. :) I liked it so much, I had to resist the urge to have it for breakfast this morning!

Okay, well I'm off to put my face on and go to the cake supply store and the grocery store...no, I never made it yesterday. Then I'll be teaching school, doing laundry and dishes, and baking some wild cakes that I will post pictures of in my "Weekend Wind-Up" for your viewing pleasure! T.G.I.F!!!

Wednesday, March 7, 2007

Works for Me Wednesday--Kitchen Edition


Our Daily Bread


And yes, I do mean daily! Since I can't have sodium, bread with baking soda is a big no-no, so I make my own yeast bread almost everyday. Yes, that is a full-size loaf like you would buy in the grocery store. This is Texas, people, we don't mess around with those little loaf pans...we do everything BIG!!! (Notice how it doesn't even fit on the cutting board? And yes, it will last about one day around here!)

Okay, so we make lots of variations of this bread, some lower fat, some sweeter, some with garlic or Mrs. Dash to go with an Italian meal, but this is the basic, oh-so-easy recipe, and coincidentally, the one we made today:

You will need:

1 cup of hot tap water
2 Tablespoons of dry yeast
2 Tablespoons of granulated sugar
3/4 cup of sweetened whipping cream
3/4 cup of milk (you can use 1 1/2 cups of milk if you don't want the fat and calories of the whipping cream...but seriously...why wouldn't you???)
5 cups of bread flour
Butter-Flavored Cooking Spray

Instructions:
Pre-heat your oven to 170 degrees.

Put 1 cup of hot tap water (about 110-120 degrees) in a 2-cup measure.
Add 2 Tablespoons of dry yeast and 2 Tablespoons of sugar and set aside. (the sugar "feeds" the yeast and gets it going.)

Put 3/4 cup sweetened baker's whipping cream and 3/4 cup milk into your mixer's bowl and (if it's not metal) put the bowl in your microwave for 45 seconds on high. You want both the bowl and the milk to be lukewarm. If your bowl is metal, you'll have to figure out another way to warm it up a little.

Attach the mixing bowl to your stand mixer, add 2 cups bread flour to the milk, and mix with the wire wisk on low speed.

Right about now, you should be noticing that your 1 cup of yeast mixture is now frothy, and growing before your eyes. Once it doubles to 2 cups, add it to the milk/flour mixture, and continue to beat on low speed.

Add 3 more cups of bread flour, one cup at a time, to the mixture. Once the mixture gets too thick for your poor wire wisk, switch to the dough hook. (This may be once you've added ALL of the flour, or only after a cup or two.) Continue to mix with the dough hook, increasing speed until the dough forms a nice ball around the hook. It should still be quite sticky though, not smooth and elastic like other breads that require kneeding. (NO KNEEDING!!! Didn't I tell you this was easy?)

Pour the sticky batter into a pan that has been sprayed with butter-flavored cooking spray, (I prefer the Crisco brand myself.) and press evenly into the bottom of the loaf pan. (This recipe will make 2 of those smaller "meatloaf" sized pans for those of you who don't have a giant, Texas-Sized pan. If you don't want two loaves, just cut the recipe in half.)

Spray the top of the dough with the butter-flavored cooking spray, and put in your 170 degree oven...BUT TURN THE OVEN OFF NOW!!!

Let the bread rise for about 30 minutes until it has risen nicely above the top of the pan. (Use the oven window and light for this.) DO NOT OPEN THE OVEN!! Just turn the oven on to 375 degrees and bake your bread for 20-25 minutes.

When the bread is nicely browned on top, and sounds hollow when you thump it, it is done! Let it cool in the pan for 10 minutes or so and then on a wire rack for another 10 minutes before cutting it.

YUM!!!

For more WFMW tips, go visit Rocks in My Dryer!